Linear Layout
A Linear Layout arranges all its children in one direction either vertical or horizontal.
this direction is set by using setOrientation() methd in Actiivty or android:orientation in .xml file. See the example.
To see the the Attributes and method of Linear Layout visit the page
Example: Vertical Linear Layout
main.xml
xmlns:tools="http://schemas.android.com/tools"
android:layout_width="match_parent"
android:layout_height="match_parent"
android:orientation="vertical"
android:layout_marginTop="30dp">
<TextView
android:id="@+id/textView1"
android:layout_gravity="center_horizontal"
android:layout_marginTop="30dp"
android:layout_marginBottom="25dp"
android:layout_width="wrap_content"
android:layout_height="wrap_content"
android:text="This Is Vertical Orientation" />
<Button
android:id="@+id/button1"
android:layout_width="fill_parent"
android:layout_height="wrap_content"
android:text="Button 1" />
<Button
android:id="@+id/button2"
android:layout_width="fill_parent"
android:layout_height="wrap_content"
android:text="Button 2" />
<Button
android:id="@+id/button3"
android:layout_width="fill_parent"
android:layout_height="wrap_content"
android:text="Button 3" />
<Button
android:id="@+id/button4"
android:layout_width="fill_parent"
android:layout_height="wrap_content"
android:text="Button 4" />
</LinearLayout>
Example: Horizontal Linear Layout
main.xml
xmlns:tools="http://schemas.android.com/tools"
android:layout_width="match_parent"
android:layout_height="match_parent"
android:orientation="horizontal"
android:layout_marginTop="30dp">
<Button
android:id="@+id/button1"
android:layout_width="wrap_content"
android:layout_height="wrap_content"
android:text="Button 1" />
<Button
android:id="@+id/button2"
android:layout_width="wrap_content"
android:layout_height="wrap_content"
android:text="Button 2" />
<Button
android:id="@+id/button3"
android:layout_width="wrap_content"
android:layout_height="wrap_content"
android:text="Button 3" />
</LinearLayout>
*********************************************************************************************************************************************************
***************************************************************************************************************************************
Table Layout
Table Layout organizes content into rows and columns. The rows are defined in the layout XML, and the columns are determined automatically by Android. This is done by creating at least one column for each element. So, for example, if you had a row with two elements and a row with five elements then you would have a layout with two rows and five columns.
You can specify that an element should occupy more than one column using android:layout_span. This can increase the total column count as well, so if we have a row with two elements and each element has android:layout_span=”3? then you will have at least six columns in your table.
By default, Android places each element in the first unused column in the row. You can, however, specify the column an element should occupy using android:layout_column.
Table Layout Example
Here is an example of Table Layout in which there are 3 Rows and each rows has 1 or more Columnsxmlns:android="http://schemas.android.com/apk/res/android"
android:layout_width="match_parent"
android:layout_height="match_parent"
android:shrinkColumns="*"
android:stretchColumns="*"
android:background="#ffffff">
<!-- Row 1 with single column -->
<TableRow
android:layout_height="wrap_content"
android:layout_width="fill_parent"
android:gravity="center_horizontal">
<TextView
android:layout_width="match_parent"
android:layout_height="wrap_content"
android:textSize="18dp"
android:text="Row 1"
android:layout_span="3"
android:padding="18dip"
android:background="#b0b0b0"
android:textColor="#000"/>
</TableRow>
<!-- Row 2 with 3 columns -->
<TableRow
android:id="@+id/tableRow1"
android:layout_height="wrap_content"
android:layout_width="match_parent">
<TextView
android:id="@+id/TextView04"
android:text="Row 2 column 1"
android:layout_weight="1"
android:background="#dcdcdc"
android:textColor="#000000"
android:padding="20dip"
android:gravity="center"/>
<TextView
android:id="@+id/TextView04"
android:text="Row 2 column 2"
android:layout_weight="1"
android:background="#d3d3d3"
android:textColor="#000000"
android:padding="20dip"
android:gravity="center"/>
<TextView
android:id="@+id/TextView04"
android:text="Row 2 column 3"
android:layout_weight="1"
android:background="#cac9c9"
android:textColor="#000000"
android:padding="20dip"
android:gravity="center"/>
</TableRow>
<!-- Row 3 with 2 columns -->
<TableRow
android:layout_height="wrap_content"
android:layout_width="fill_parent"
android:gravity="center_horizontal">
<TextView
android:id="@+id/TextView04"
android:text="Row 3 column 1"
android:layout_weight="1"
android:background="#b0b0b0"
android:textColor="#000000"
android:padding="18dip"
android:gravity="center"/>
<TextView
android:id="@+id/TextView04"
android:text="Row 3 column 2"
android:layout_weight="1"
android:background="#a09f9f"
android:textColor="#000000"
android:padding="18dip"
android:gravity="center"/>
</TableRow>
</TableLayout>
*********************************************************************************
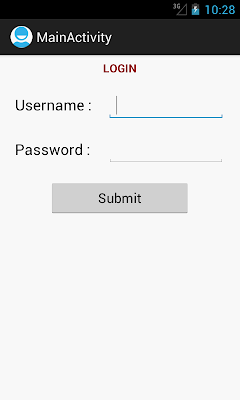
Lets have a live example and create a User Login Screen
Create Login Screen Using Table Layout
<TableLayout xmlns:android="http://schemas.android.com/apk/res/android"
android:layout_width="fill_parent"
android:layout_height="fill_parent" >
<TableRow
android:paddingTop="10px"
android:gravity="center">
<TextView
android:id="@+id/status"
android:layout_width="wrap_content"
android:layout_gravity="center"
android:layout_span="2"
android:text="LOGIN"
android:textColor="#890000"
android:textSize="15sp"
android:textStyle="bold" />
</TableRow>
<TableRow android:layout_marginTop="20dip" >
<TextView
android:layout_width="wrap_content"
android:text="Username :"
android:textSize="20sp"
android:textColor="#000000"
android:layout_marginLeft="20dip">
</TextView>
<EditText
android:id="@+id/screenName"
android:layout_height="wrap_content"
android:layout_marginLeft="20dip"
android:layout_marginRight="20dip"
android:layout_weight="1" >
</EditText>
</TableRow>
<TableRow android:layout_marginTop="20dip" >
<TextView
android:text="Password :"
android:layout_width="wrap_content"
android:textSize="20sp"
android:textColor="#000000"
android:layout_height="wrap_content"
android:layout_marginLeft="20dip">
</TextView>
<EditText
android:id="@+id/password"
android:layout_height="wrap_content"
android:layout_marginLeft="20dip"
android:layout_marginRight="20dip"
android:layout_weight="1" >
</EditText>
</TableRow>
<TableRow
android:gravity="center"
android:layout_marginTop="20dip" >
<Button
android:text="Submit"
android:clickable="true"
android:layout_width="wrap_content"
android:layout_height="wrap_content"
android:id="@+id/save"
android:layout_span="2" >
</Button>
</TableRow>
</TableLayout>
***********************************************************************************************************************************************************************************
************************************************************************************************************************************************************************************
Frame Layout
FrameLayout is designed to display a single item at a time. You can have multiple elements within a FrameLayout but each element will be positioned based on the top left of the screen. Elements that overlap will be displayed overlapping. I have created a simple XML layout using FrameLayout that shows how this works.
Frame Layout Example
<FrameLayout
 android:layout_width="fill_parent"
 android:layout_height="fill_parent"
 xmlns:android="http://schemas.android.com/apk/res/android">
 <ImageView
  android:src="@drawable/icon"
  android:scaleType="fitCenter"
  android:layout_height="fill_parent"
  android:layout_width="fill_parent"/>
 <TextView
  android:text="Learn-Android.com"
  android:textSize="24sp"
  android:textColor="#000000"
  android:layout_height="fill_parent"
  android:layout_width="fill_parent"
  android:gravity="center"/>
</FrameLayout>
*************************************************************************************************************************************************************************************
*************************************************************************************************************************************************************************************
GridLayout
GridView is a ViewGroup that displays items in a two-dimensional, scrollable grid. The grid items are automatically inserted to the layout using a ListAdapter.
GridView Example
<?xml version="1.0" encoding="utf-8"?>
<GridView xmlns:android="http://schemas.android.com/apk/res/android"
    android:id="@+id/gridView1"
    android:numColumns="auto_fit"
    android:gravity="center"
    android:columnWidth="50dp"
    android:stretchMode="columnWidth"
    android:layout_width="fill_parent"
    android:layout_height="fill_parent" >

</GridView>
GridViewActivity
public class GridViewActivity extends Activity {

 GridView gridView;

 static final String[] numbers = new String[] {
   "A", "B", "C", "D", "E",
   "F", "G", "H", "I", "J",
   "K", "L", "M", "N", "O",
   "P", "Q", "R", "S", "T",
   "U", "V", "W", "X", "Y", "Z"};

 @Override
 public void onCreate(Bundle savedInstanceState) {
  super.onCreate(savedInstanceState);

  setContentView(R.layout.main);

  gridView = (GridView) findViewById(R.id.gridView1);

  ArrayAdapter<String> adapter = new ArrayAdapter<String>(this,
    android.R.layout.simple_list_item_1, numbers);

  gridView.setAdapter(adapter);

  gridView.setOnItemClickListener(new OnItemClickListener() {
   public void onItemClick(AdapterView<?> parent, View v,
    int position, long id) {
      Toast.makeText(getApplicationContext(),
    ((TextView) v).getText(), Toast.LENGTH_SHORT).show();
   }
  });

 }

}


exelente
ReplyDelete